Design and Develop a Website Using Asp.net Mvc 4 Ef
In this tutorial, I will create a project with Login and Registration using Identity in ASP.NET Core 3.1.ASP.NET Core Identity is an API that supports login functionality in ASP.NET Core MVC web application. Login information will be saved in identity. Identity can also be configured to use the SQL Server database. We will use the Entity Framework to store user details. Such as username, password, and other columns we required in our ASP.NET Core Web Application. This article will explain how to use ASP.NET Core identity to register, login, and log out in your Web Application and use Entity Framework.
Before we start, Please make sure to have installed the following
- The latest version of Visual Studio
- Alternatively, you can also use the Visual Studio Code.
- SQL Server
Up to 80% OFF Web Hosting Plans +
– Hostinger
FREE Domain + FREE SSL

If you already have installed all of that , then let's start.
I. Setup ASP.NET Core Web Application with Identity
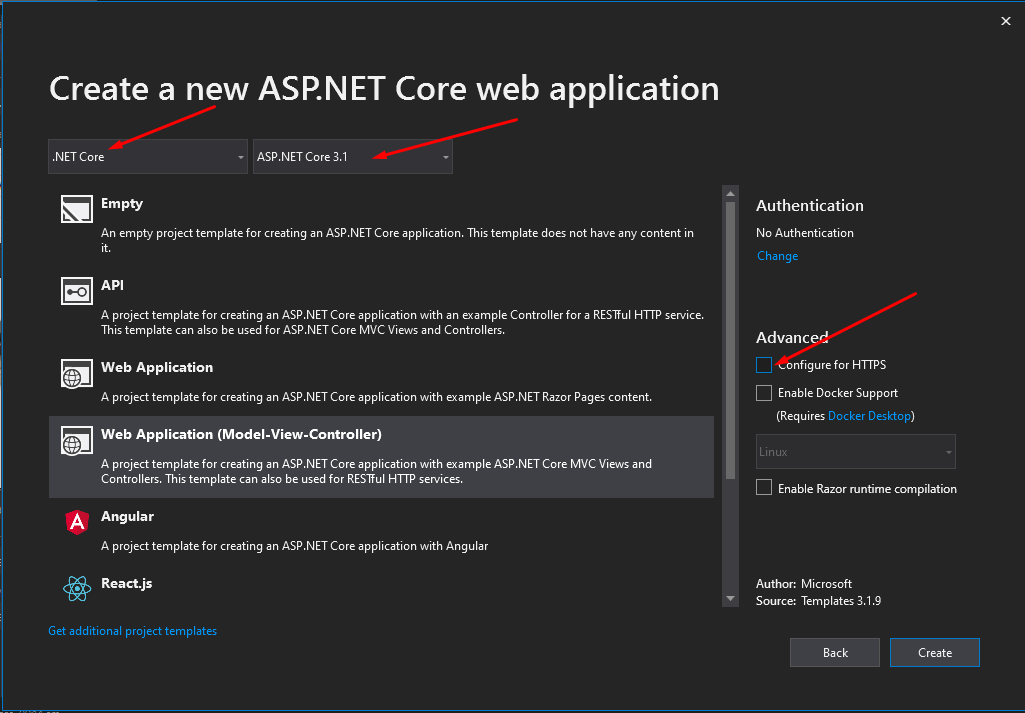
- First, create your ASP.NET Core Web Application. To do that just follow the steps below.
- SelectFile >New >Project.
- SelectASP.NET Core Web Application. Name the projectCore3.1 to have the same namespace as my project. ClickOK.
- Select an ASP.NET CoreWeb Application. and then uncheck Configure for HTTPS.
- Lastly, Click on Create.
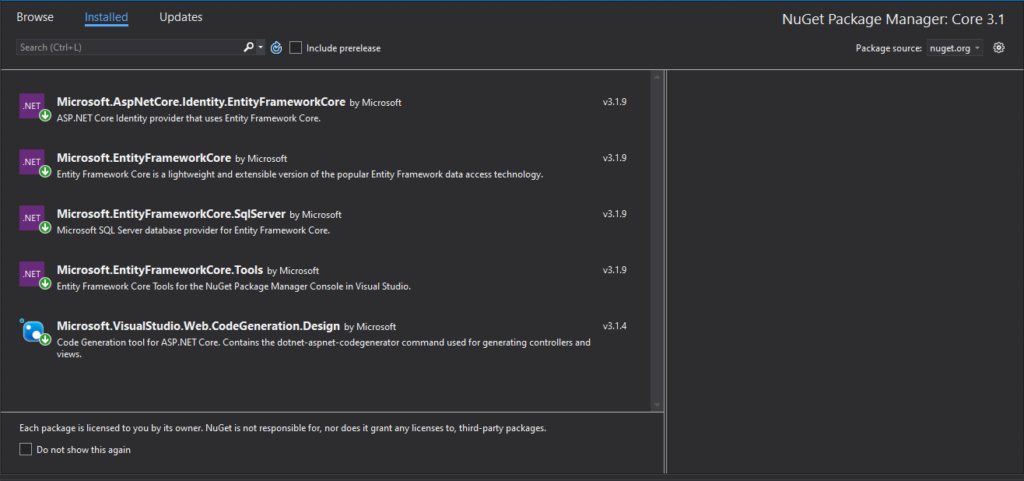
2. Now we need to install required packages for this project. I have listed it all below.
- Microsoft.AspNetCore.Identity.EntityFrameworkCore
- Microsoft.EntityFrameworkCore
- Microsoft.EntityFrameworkCore.SqlServer
- Microsoft.EntityFrameworkCore.Tools
Use Nuget Package Manager to install this package.If this is your first time using this you can visit this article.
3. After we gather all the necessary package, we need to configure our Web Application to connect to our SQL Server. Open your Startup.cs file and follow these three simple steps.
3.1 Setup your SQL Server Configure Connection inside appsettings.json file

"ConnectionStrings": { "default": "Data Source=DESKTOP-4DU98BI\\SQLEXPRESS01;Initial Catalog=Codefirst;Integrated Security=True;Connect Timeout=30;Encrypt=False;TrustServerCertificate=False;ApplicationIntent=ReadWrite;MultiSubnetFailover=False" } 3.2 Configure your startup class by adding the below code inside the ConfigureServices method. This will read the connection string we put inside appsettings.json and initialize our web Application to use the SQL Server Database.
string connectionString = Configuration.GetConnectionString("default"); services.AddDbContext<AppDBContext>(c => c.UseSqlServer(connectionString)); 3.3 To enable Authentication for our Web Application, initialize the code below inside the Configure method right above the app.UseAuthorization();
app.UseAuthentication(); 4. To handle our database structure and queries using Entity Framework, we need to create a DBContext Class. This we will handle the handshake with our Web Application and the Database. To use the ASP.NET Core Identity and create its default Identity database schema, we need to extend our class to use IdentityDbContext. To see it in action, create AppDBContext Class under the Models folder and copy the code below.
public class AppDBContext : IdentityDbContext { private readonly DbContextOptions _options; public AppDBContext(DbContextOptions options): base(options) { _options = options; } protected override void OnModelCreating(ModelBuilder modelBuilder) { base.OnModelCreating(modelBuilder); } } 5. Now, Register Identity Services to your Web application by adding this line of code inside the ConfigureServices method. This will allow us to use Identity functionality. This class is bound with ASP.NET Core AppDBContext Class, which handles our Database.
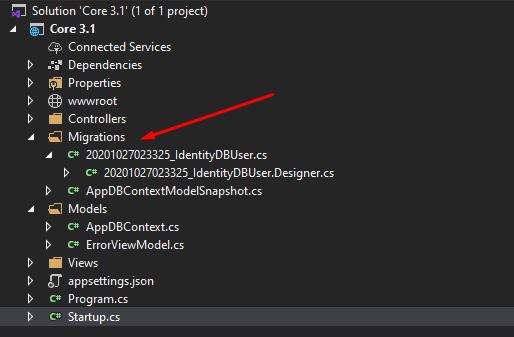
services.AddIdentity<IdentityUser, IdentityRole>().AddEntityFrameworkStores<AppDBContext>(); - Now, we need to create a migration. These steps will generate a Migration builder that contains all the Table schema we need. This schema is base on the extended properties of the IdentityDBContext Model.
II. Migrations
- Package Manager Console > Add-Migration IdentityDBUser
- Visual Studio Code Terminal > dotnet ef migration add IdentityDBUser
This will create a Migration folder and classes base on ASP.NET Core Identity.
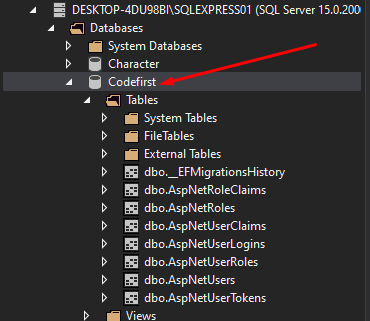
7. This migration contains a table builder base on ASP.NET Core Identity. Now, We need to create the actual tables by merely running a single line of code.
- Package Manager Console > Update-Database
- Visual Studio Code Terminal > dotnet ef database update
If we open our database, we should see a new table created with all the tables needed. If you could not locate your database name, navigate your connection string inside appsettings.json.
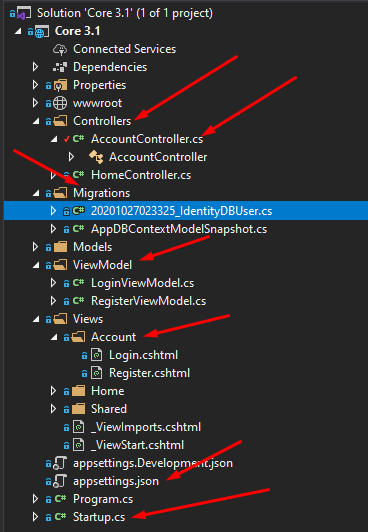
We finish with the tricky part. Now, all we need to do is create our Models, UI, and Controller. I'll do a straight forward step. For your reference, I'll put an image below for my Project folder structure. Don't worry. At the end of this tutorial, I will attach the link to my source code.
III. Login and Registration using Identity in ASP.NET Core 3.1
If you are not familiar with the ASP.NET MVC structure, you may refer to this article ASP.NET MVC File Architecture or post your questions in the comment section.
IV. Create ViewModels
8. Create RegisterViewModel Class. This will be the properties for my View.
[Required] [EmailAddress] public string Email { get; set; } [Required] [DataType(DataType.Password)] public string Password { get; set; } [DataType(DataType.Password)] [Display(Name ="Confirm Password")] [Compare("Password",ErrorMessage ="Password and confirmation password not match.")] public string ConfirmPassword { get; set; } 9. Create LoginViewModel Class.
[Required] [EmailAddress] public string Email { get; set; } [Required] [DataType(DataType.Password)] public string Password { get; set; } [Display(Name = "Remember Me")] public bool RememberMe { get; set; } V. Create Register Action » AccountController
10. Create a controller name it AccountController. This is where all my function for validation is located.
11. Open AccountController. Create a constructor inside the controller class and add UserManager and SignInManager. This will handle our login validation and Registration of our user identity.
private readonly UserManager<IdentityUser> _userManager; private readonly SignInManager<IdentityUser> _signInManager; public AccountController(UserManager<IdentityUser> userManager, SignInManager<IdentityUser> signInManager) { _userManager = userManager; _signInManager = signInManager; } 12. Inside AccountController creates the Register method. This method will validate the input of a new user identity and register it to our database.
public IActionResult Register() { return View(); } [HttpPost] public async Task<IActionResult> Register(RegisterViewModel model) { if (ModelState.IsValid) { var user = new IdentityUser { UserName = model.Email, Email = model.Email, }; var result = await _userManager.CreateAsync(user, model.Password); if (result.Succeeded) { await _signInManager.SignInAsync(user, isPersistent: false); return RedirectToAction("index", "Home"); } foreach (var error in result.Errors) { ModelState.AddModelError("", error.Description); } ModelState.AddModelError(string.Empty, "Invalid Login Attempt"); } return View(model); } VI. Create Register View
13. Create and design a View. This view should bind to the RegisterViewModel properties so that we can use DataAnotation in this view. This function will validate our input base on the properties that we declare on our view model.
Below are the codes inside my Register.cshtml.
@model SLE_System.Models.RegisterViewModel @{ ViewData["Title"] = "Register"; } <h1>Register</h1> <div class="row"> <div class="col-md-12"> <form method="post"> <div asp-validation-summary="All" class="text-danger"></div> <div class="form-group"> <label asp-for="Email"></label> <input asp-for="Email" class="form-control" /> <span asp-validation-for="Email" class="text-danger"></span> </div> <div class="form-group"> <label asp-for="Password"></label> <input asp-for="Password" class="form-control" /> <span asp-validation-for="Password" class="text-danger"></span> </div> <div class="form-group"> <label asp-for="ConfirmPassword"></label> <input asp-for="ConfirmPassword" class="form-control" /> <span asp-validation-for="ConfirmPassword" class="text-danger"></span> </div> <button type="submit" class="btn-primary">Register</button> </form> </div> </div> VII. Create Login Action » AccountController
14. Create IActionResult method name it Login inside AccountController.
[HttpGet] [AllowAnonymous] public IActionResult Login() { return View(); } [HttpPost] [AllowAnonymous] public async Task<IActionResult> Login(LoginViewModel user) { if (ModelState.IsValid) { var result = await _signInManager.PasswordSignInAsync(user.Email, user.Password, user.RememberMe, false); if (result.Succeeded) { return RedirectToAction("Index", "Home"); } ModelState.AddModelError(string.Empty, "Invalid Login Attempt"); } return View(user); } VIII. Create Login View
15. Add View name Login.cshtml. This view should be inside Views > Account. Copy the codes below.
@model SLE_System.Models.LoginViewModel @{ ViewData["Title"] = "Login"; } <h1>Login</h1> <div class="row"> <div class="col-md-12"> <form method="post"> <div asp-validation-summary="All" class="text-danger"></div> <div class="form-group"> <label asp-for="Email"></label> <input asp-for="Email" class="form-control" /> <span asp-validation-for="Email" class="text-danger"></span> </div> <div class="form-group"> <label asp-for="Password"></label> <input asp-for="Password" class="form-control" /> <span asp-validation-for="Password" class="text-danger"></span> </div> <div class="form-group"> <div class="custom-control custom-checkbox"> <input asp-for="RememberMe" type="checkbox" class="custom-control-input"> <label class="custom-control-label" asp-for="RememberMe">@Html.DisplayNameFor(m => m.RememberMe)</label> </div> </div> <button type="submit" class="btn-primary">Login</button> </form> </div> </div> IX. Create Logout Action » AccountController
16. Create IActionResult method inside AccountController. Name it Logout().
public async Task<IActionResult> Logout() { await _signInManager.SignOutAsync(); return RedirectToAction("Login"); } X. Customize Menu » _Layout.cshtml
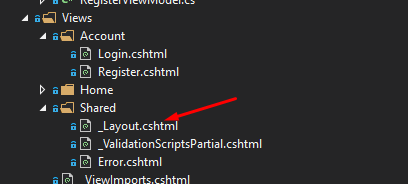
17. Now, we need to customize which menu will be visible for an unauthenticated user. To do that, open your Shared Folder under Views and select _Layout view. This view handles the main layout of your Web Application.
One way to handle this is to drop to C# code and use User Identity to check the user's validity. Please refer to the code below.
@if (User.Identity.IsAuthenticated) { <ul class="navbar-nav flex-grow-1"> <li class="nav-item"> <a class="nav-link text-dark" asp-area="" asp-controller="Home" asp-action="Index">Home</a> </li> <li class="nav-item"> <a class="nav-link text-dark" asp-area="" asp-controller="Home" asp-action="Privacy">Privacy</a> </li> <li class="nav-item"> <a class="nav-link text-dark" asp-area="" asp-controller="Account" asp-action="Logout">Logout</a> </li> </ul> } else { <ul class="navbar-nav flex-grow-1"> <li class="nav-item"> <a class="nav-link text-dark" asp-area="" asp-controller="Account" asp-action="Login">Login</a> </li> <li class="nav-item"> <a class="nav-link text-dark" asp-area="" asp-controller="Account" asp-action="Register">Register</a> </li> </ul> } Suppose you have followed all the steps above. You now have fully implemented a Web Application with Login and Registration using Identity in ASP.NET Core 3.1. We use ASP.NET Core Entity Framework in this. If this was confusing for you, let me know how to improve my writing style by commenting below.
I will attach a link to my github repository below. Don't forget to leave a comment. Thank you! Happy coding!.
Source Code:
Use this link GitHub. to get the source code I used in this tutorial. Thank you.
Design and Develop a Website Using Asp.net Mvc 4 Ef
Source: https://www.freecodespot.com/blog/asp-net-core-identity/
0 Response to "Design and Develop a Website Using Asp.net Mvc 4 Ef"
Post a Comment